
Well I decided to try snow dyeing one more time only this time I did it a bit different. Instead of squirting dye all over the snow outside what I did was take a one metre length of fabric (that had been soaked in soda ash and wrung out) and put it in a plastic bin and scrunch the fabric up in the bin.

Scrunched fabric in plastic bin.
I then took the bin/fabric outside to the deck and put handfuls of snow on top of the material until it was covered.

Snow covered fabric in bin.
I then took the bin into the laundry room and began to squirt dye over the snow in what I hoped was a pleasing pattern. The dyes I used where cerulean blue, grecian rose, ivory and avocado.

Cerulean blue, grecian rose, ivory and avocado.
I tilted the container slightly so that the melted snow and dye wouldn’t pool under the fabric and as the snow melted I used a syringe to siphon off the liquid. This method had the snow melting at a quicker rate than last time when the fabric and snow was in a massive lump.

Snow melting, fabric propped up with some extra containers so it wouldn’t slide down into excess dye.

Dye pooled at bottom with syringe on the left for draining it.

Material with all the snow removed.
At one point most of the dye had drained down through the snow so I just removed the excess snow as it didn’t seem it would have any effect on the fabric. I took the fabric and nuked it for three minutes as I’m too impatient to wait for the material to batch. I then washed it out.
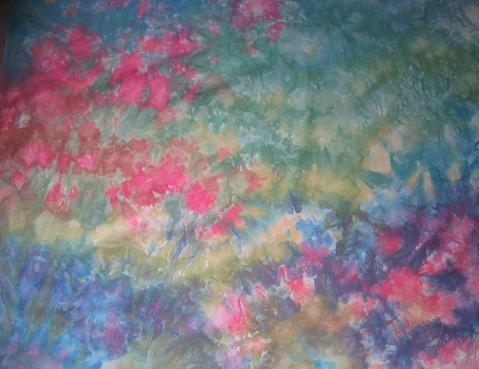
Finished fabric, reminds me of a Monet garden.
I decided to take the remaining dye and create a couple of parfaits the way I normally do them – in a vase. I take a piece of fabric and squirt some dye into the bottom of the vase; I then tamp down a corner of the fabric, I then squirt more dye onto this fabric, tamp it down, squirt dye, tamp down fabric…etc, etc. I then put a cup of water + soda ash on top of the tamped down fabric and let it batch for a couple of hours before wash out.
The first piece I did I forgot to wet it with water first so when I applied the dye the fabric sucked it right in. I was afraid that all I would end up with was blobs of fabric but it still seemed to have a bit of creep along the folds after I added the soda water.

Cerulean blue, grecian rose, ivory, avocado parfait – medium intensity.
I then took the remaining dye and added water to twice the volume to have a lighter batch of dyes and then did another parfait.

Cerulean blue, grecian rose, ivory, avocado parfait – light intensity.
The difference between the regular parfaits and the snow dyed parfait is in the edges. The snow dyed piece on the whole has a softer blending of the edges whereas the other parfaits the colours creeps along the folds so I guess it just depends on what effect you’re after as to which method you want to use.
I’m thinking it would be cool to freeze dye as ice cubes and then smash then into little pieces and sprinkle these pieces onto a piece of flat fabric. I’m wondering if the effect would be similar to salt crystals but maybe not.
Karen

KAREN!!! You are really getting into this snow-dyeing thing! You have a beautiful piece! Isn’t it interesting the way several of us do the same technique but in different ways? I pour dye out on the snow, scoop it up, plop it on the fabric. You put the white snow on and then pour the dye. I’ll have to try it that way, too!
Next time I dye I also want to do some more vase parfaits. I LOVE that technique.
Kelly
very interesting results. I’m not sure I won’t just continue to do parfaits the way I have been. I do appreciate your explanation, tho.
I am seriously hoping, tho, that snow season has ended here for now. It didn’t take me long to come home today when I saw the storm brewing at the Y this morning.
Looks like it was a fun cruise.
Bob and I saw the Queen Mary 2 at St. Johns in New Brunswick and it was HUGE, also. I expect it was a welcome relief from the winter you have been having. Ann
It was such a welcome relief, the cruise that is, just to get the sun. It hasn’t been to bad since we’ve returned home knock wood, sun-wise that it.
I’ve decided to send on the two smaller parfait for the swap as everyone needs bright colours at this point in the year.
Vase parfait are very easy and little cleanup.
Karen
Very nice fabrics Karen. I finally got some snow today, may give it a try.
Very cool.
I wish it would snow here now.}:(
Karen,
your fabric looks great! Wonder how the crushed ice would look.
Wow I thought the last piece was good – this is even better. I seriously think I need to move where there is snow…..vbg….as if….don’t think I could stand the cold.
Great snow died pieces and parfaits. Great idea about putting the snow on then the dye hadn’t thought of that.
OMG I spelled dye wrong. OPPS
Hi Karen, This one is absolutely gorgoeus!!
You have really got a good system going, and the parfaits are good for support fabric for what you might just do with them. I just love this last one snow dye
I love your pictures showing the snow dyeing. Last year I did up a bunch of fabric at a quilting retreat. We did all of ours in jars and what beautiful colors.
This is so cool! I’m thinking of trying it out with yarn. I’ll bet it would have some lovely results. Thanks for such detailed instructions!
Thanks let me know when you try it out I wouldn’t mind seeing your yarn when it’s dyed. I have several friends who dye yarn but I’ve yet to try it.
Karen
Pingback: Snow and Craft and Crafting with Snow! | Craft Test Dummies